So for some reason my Rubik's Cube post has just blown up and is now my highest view post by over 100 views! Craziness! Thank you to all the math nerds making my post so popular. Just thought I'd share that.
Annnnnnnnnnnnd back to your regularly scheduled program . . . .
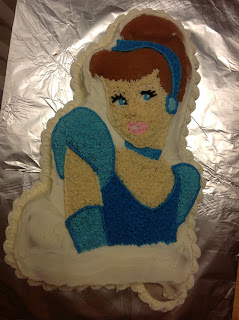
My niece Elisa turned four in April. (Yes, I realize that was months ago, I'm a bit behind). She loves princesses. She knew all of their names even before she had seen a single Disney movie. She loves dressing up and pretending all sorts of things with that fantastic imagination of hers. So I made her a cake worthy of a princess - one of her favorites, Cinderella. (Although I've been informed that now Cinderella is much lower on the list, trailing Rapunzel, Snow White, and a few others.)
I made this Cinderella cake using a character pan. I bought it on ebay because this one is no longer available in stores. Character pans are great because you don't have to use a lot of brain power to decorate them. You just outline, fill in, and get to go to bed relatively on time. They even have instructions on what tips and colors to use. The only problem is that they are usually only good for one thing - and so your pantry quickly fills up with specialty cake pans . . . . .
I made a yellow cake and frosted the outside with white buttercream. You don't want to cover the whole thing because then you can't see the outline.
Now usually adding a border is something you do last, when the cake is fully decorated. This time, I did it near the beginning. I wanted the border to be white, but I also didn't want to have to make a TON of frosting. So my plan was to do all the white parts so I wouldn't have to save any for later when I mixed the colors.
So next, I did the eyes, teeth and nose. Then I added some cream colored frosting to make the skin. Pipe Outlines.
 |
| It looks a little creepy at this stage. |
 |
| I need to work on my lips . . . . |
 |
| Starting to look more like Cinderella. |
And last but not least, the hair.
To get this affect, you use a big tip, like number 12. Then you pipe out big blobs of icing. Finally, smooth with a finger dipped in cornstarch.
Done and done. No drama, no crazy balancing acts required, no fondant. And it still looks beautiful.
 |
| You can appreciate the 3-d effect from this angle. She looks ready to jump off the cake. |
She's four going on sixteen.
Happy Birthday Elisa! I know you are already thinking about what next year's cake will be.


