Saturday, September 21, 2013

A Cake Fit for a Princess

So for some reason my Rubik's Cube post has just blown up and is now my highest view post by over 100 views!  Craziness!  Thank you to all the math nerds making my post so popular.  Just thought I'd share that.

Annnnnnnnnnnnd back to your regularly scheduled program . . . .

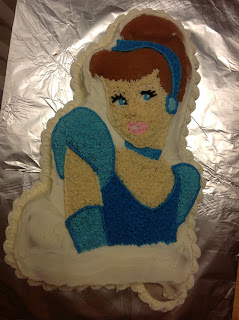
My niece Elisa turned four in April.  (Yes, I realize that was months ago, I'm a bit behind).  She loves princesses.  She knew all of their names even before she had seen a single Disney movie. She loves dressing up and pretending all sorts of things with that fantastic imagination of hers.  So I made her a cake worthy of a princess - one of her favorites, Cinderella.  (Although I've been informed that now Cinderella is much lower on the list, trailing Rapunzel, Snow White, and a few others.)

I made this Cinderella cake using a character pan.  I bought it on ebay because this one is no longer available in stores.  Character pans are great because you don't have to use a lot of brain power to decorate them.  You just outline, fill in, and get to go to bed relatively on time.  They even have instructions on what tips and colors to use.  The only problem is that they are usually only good for one thing - and so your pantry quickly fills up with specialty cake pans . . . . .


I made a yellow cake and frosted the outside with white buttercream.  You don't want to cover the whole thing because then you can't see the outline.


Now usually adding a border is something you do last, when the cake is fully decorated.  This time, I did it near the beginning.  I wanted the border to be white, but I also didn't want to have to make a TON of frosting.  So my plan was to do all the white parts so I wouldn't have to save any for later when I mixed the colors.

So next, I did the eyes, teeth and nose.  Then I added some cream colored frosting to make the skin.  Pipe Outlines.

It looks a little creepy at this stage.
Next, add lips, blue part of the eyes and the necklace and headband outlines.

I need to work on my lips . . . .
Then I piped in the skin and added the eyelashes.  Cinderella's got a heavy hand with the mascara.

Starting to look more like Cinderella.
I needed two different blues for the dress, which I thought turned out pretty well.


And last but not least, the hair.


To get this affect, you use a big tip, like number 12.  Then you pipe out big blobs of icing.  Finally, smooth with a finger dipped in cornstarch.


And then finally, I added the scroll and piped the words, Happy Birthday!


Done and done.  No drama, no crazy balancing acts required, no fondant.  And it still looks beautiful.


You can appreciate the 3-d effect from this angle.
She looks ready to jump off the cake.
And here's my favorite little princess, posing with her cake.


She's four going on sixteen.


Happy Birthday Elisa!  I know you are already thinking about what next year's cake will be.

Saturday, June 29, 2013

Is there a Doctor in the house?

Remember when I said I have a lot of cousins?  Well, my cousin Rebekah also got married this year.  Her wedding shower was in April.  At my cousin Annie's wedding shower, my Aunt Renee asked me if I would make the cake for Rebekah's shower.

This cake went SO smoothly.  It was so nice to have a cake without drama.  Seriously.

At the time, Rebekah was still in med school (she has since graduated).  So my aunt thought it would be fun to have a doctor cake.  Ah yes, I thought.  I can make a flat cake that looks like a lab coat and I won't have to worry about anything falling over or off the cake.

I baked the cake ahead of time and it turned out perfect.  Even when I cut it in half, it looked amazing.  Usually I get air pockets that I stuff with extra cake.

Beautiful!
This time I made a yellow cake with strawberry filling.


Next up, frosting the cake.  I had to take a picture of my mixer in my kitchen, first time making a cake in my new house!


I knew the frosting didn't have to be perfect because I was going to cover it with fondant.


First I made the part for the shirt.


Next I had to roll out a huge piece of fondant to cover the entire cake.  Now in order to do this, I used my super amazing, huge rolling pin.  Here it is next to a normal sized rolling pin:


Ok, just kidding.  It's not THAT big.  Here it is next to a real normal sized rolling pin:

This thing is awesome.

 I knew the fondant piece had to be about as big as my roll and cut mat.  I had never covered an entire rectangle cake before, so I was hoping it would work.


I rolled it out . . .


And draped it over the cake.  Perfect fit, the first time!


 I cut a slit down the middle to make the opening of the lab coat.


I used my medium circle cutter to make buttons.  The small holes are made using the small end of tip #3.


I glued the buttons on the coat.  But I couldn't just leave it at that!  We needed some more details.  So I fashioned a stethoscope.


Here's a close up of the stethoscope.

I also made a pocket with some other "doctory" things in it.

That's a pen, if you couldn't tell.  And a reflex hammer.

It's starting to look pretty good!


Finally I added a pearl necklace . . .


And a nametag with her new last name.


And I was done.


 It went in the box.  No drama.  Score!


Here is the lovely bride holding her cake.

Photo taken by my cousin, Charity Hoffman

And then before we cut it, all the girl cousins who were there took a picture together, with the cake.

Photo taken by Charity's camera - not sure who took it.

 Congratulations Rebekah (and Peter) both on graduating from med school and getting married!


Tuesday, June 18, 2013

Going to the Chapel

Here is the story of my first wedding cake.

I met Lori in college.  We sang in the Women's Chorale together and we ran Project Infiltration together (remember how much fun that was?).  Our senior year, we lived in the Long House with 8 other girls.  That's right, ten girls and two bathrooms.  Don't ask me how we did it.  The Long House doesn't exist anymore, but it lives on in spirit.  The thing I love about the Long House Girls is that I know that they would drop everything and be there in five minutes if I needed them.  They are pretty awesome.

They are also fans of my cakes!  So when Lori asked me to make her wedding cake, I was very excited.  I know, I'm always excited to try something new.

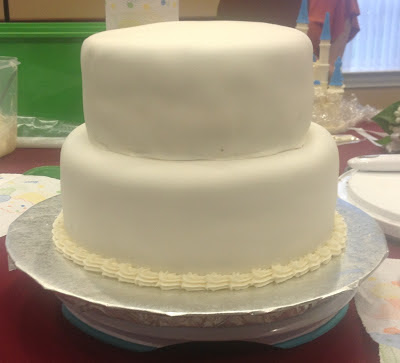
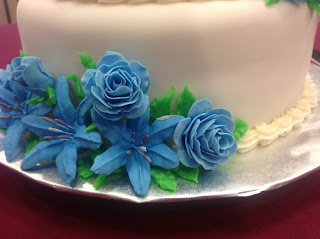
We decided to do a two-tiered cake with blue flowers on each tier.  Lori bought a Disney castle cake topper made of white chocolate for the third tier.  

It looked something like this:

We have pictures of it, but they are on Lori's phone and since she is on her honeymoon,
I'll just have to wait until they get back to add them.
The Wednesday before the wedding I went over to Lori's parents and painted the towers blue (so they would look like the actual castle).  It took about two hours of carefully painting royal icing, but I managed to finish without getting it anywhere it wasn't supposed to be.

Painted Disney Castle
Pretty awesome!

I started working on the flowers a few weeks before the wedding.  The roses were more time consuming, so I did them first.  

Drying Roses
I made varying sizes and also made sure I had enough extras in case some of them broke.  The lilies were much simpler because I just piped them using royal icing.

Lilies ready to go on the cake.
The night before the wedding I baked the cakes and added the filling.  They turned out really nice and flat.


Around this time my friend Rachel showed up.  Rachel is also a Long House girl and she has been my cake assistant in the past (see Oh Boy).  She was such a tremendous help with this cake.  She stayed up with me as I worked, catching me up on her life and keeping me awake so I could finish.

After I frosted the cakes, it was time to put the fondant on.  Now I had only covered a round cake completely with fondant once - and that was in one of my Wilton classes.  So I was a little nervous about it.  It can get tricky when you try to smooth it out.  But everything went great!  I have a lot of action shots because Rachel had the camera while I was working.

Smoothing the fondant on.


You have to be careful when you cut the excess fondant off.  If you cut exactly where the crease is at the bottom, it will be too short.  Both cakes came out great.


Trimming the fondant
And then it was time for bed.

DAY OF THE WEDDING:

(Note: I was super nervous about this.  It wasn't anything I hadn't done before in some way, shape or form, but it was for Lori's wedding.  I mean, if I messed up, there was no time to get a replacement cake.  That's a lot of pressure).

Since I had to assemble the cake at the venue, I had a game plan all set out.  We got ready in the morning and brought our wedding clothes with us so we could change after finishing the cake.  We arrived around 9:30.  The wedding started at 11.  I was feeling the time crunch, but Rachel kept encouraging me that we would make it.

The cake needed support (especially with that heavy topper), so I was going to have Rachel cut the plastic dowels while I piped the border on the bottom cake.  Of course as I showed her how to cut them,


My scissors broke.  I couldn't believe it!  I had done this so many times before, and now, on the day of Lori's wedding, with the clock ticking, my blasted scissors decided it was a good time to snap!?!?!?!?

Rachel promptly went and asked someone for scissors.  She saved my butt a lot that day.


I piped a beautiful shell border in record time.  Then we added the supports.


And the next tier went on.  Repeat process.


No one really wanted to touch the cake topper for fear of breaking it.  But that went smoothly too.  The cake seemed to be slightly leaning to the side, so we countered that by putting the topper on a little off-center.  Didn't want the whole thing to topple over.


I added the final border.


Then we had to arrange the flowers.


Since the lilies were bigger, we built the setup around them.


We were almost done.  Rachel started cleaning up while I added the final touch, and my favorite part, the leaves.


I finished around 10:40, giving us plenty of time to change and make our way across the street to the sanctuary for the wedding.


The leaves just add that extra pop of color that makes it look so nice!


Here's the view from the back.

Back view.
And from the side.

Side view.
And let's look at those flowers again . . .


Of course there is always time to take pictures.


The cake did not topple or sink, nothing fell off, the topper didn't break - I'd say it was quite a success.

The bride and groom
Jason, Lori's husband, cut the cake quite expertly, managing to avoid the cake boards as well as all the supports in the cake.  It was impressive.


The cake was also a great success with the wedding guests.  I've never seen so many people trying to take pictures of the wedding cake.  That was pretty cool.


Congratulations Lori and Jason!  Here's to many years of cake eating together!  Thank you for taking a risk and letting me give this gift to you.  You never forget your first wedding cake.