Showing posts with label Flowers. Show all posts

Sunday, January 24, 2021

A Lovely Bouquet of Flowers

I've already used my cake kitchen again!

My co-worker, Diana, retired this January after many years of service.  She worked in the office through 4 or 5 different county attorneys.  Because of COVID, we couldn't have a retirement party for her, but we still wanted to give her a special send off.

I was in charge of cupcakes (the COVID friendly cake).  I wanted to do something pretty that wasn't super complicated and I discovered the cupcake bouquet!

I started by making yellow cake and adding green food coloring so there would be this yellow color sticking out under the frosting flowers.

We weren't able to have Christmas with my in-laws this year but my mother-in-law sent us some goodies in this beautiful basket.  it was perfect for the display.  I bought a foam half circle and covered it with green tissue paper.

I filled half the cupcakes with butterscotch pudding.  Then I colored the icing and made the flowers.  Some of these I learned a long time ago and others I learned from youtube videos.  I didn't make enough icing to frost all of the cupcakes, so if I do it again, I would probably do one and a half batches.  But it made enough for the bouquet.

Next I stuck toothpicks in the cupcakes and then stuck them into the foam circle.  The problem was that the filled ones wouldn't hold up! 

I ended up putting the filled ones around the bottom edge and the regular ones on the top.  Next time I would skip the filling so it would be easier to place them.  Next I tore up strips of dark green crepe paper and put it in between the cupcakes to look like leaves.

As you know, leaves are my favorite thing to pipe because they just add so much depth to flowers.  The crepe paper here did the same thing and really made it look spectacular.


If you don't look too closely, it looks like I'm delivering a basket of flowers!


Up until lunch, the cupcakes sat on Diana's desk next to the real flowers.  A bunch of people did a double take before realizing they were cupcakes!


This turned out so well.  It looked adorable, it was bright and cheery, and it was fairly easy to make.  I would definitely do this one again.


 Happy retirement, Diana!

Friday, November 7, 2014

Stressed is Desserts Spelled Backwards

Week one of my three cakes in three weeks was done.  Now on to week two.

Wedding cakes are high stress.  I mean, if you mess up a birthday cake, eh, they will get another one next year.  But a wedding cake?  That's a one-time thing.  And so I could also have named this post "The great hunt for violet food coloring," or, "The time my life flashed before my eyes."

But let's start at the beginning.

Tehillah had asked me to make her wedding cake.

At first, she and her fiance just wanted me to decide what to make.  MINOR PANIC ATTACK.  I know that choosing what you want on a cake can be fairly overwhelming, but what if I picked something they didn't like?

So Tehillah and I had a cake consultation.  I think it was easier for her once I showed her some options and she was able to tell me what she liked and didn't like.

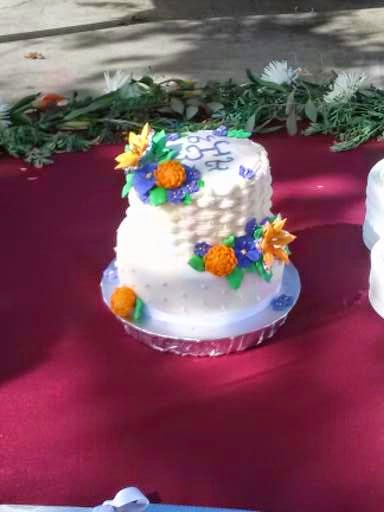
We decided on a two-tier cake.  The bottom tier would be smooth fondant with a ribbon border and white pearls.  The top tier would be the basketweave.  Then I would make orange mums and lilies and purple violets, plus green leaves, to go on the top and sides.  Finally, I would pipe their initials on the top.

I made some of the flowers out of fondant and some out of royal icing.  The orange mums turned out great.  I learned how to make these in one of my Wilton classes.  The color was perfect and I didn't really have any problems putting them together.

Mum bases.
Mum.

It should have been a sign.

The night I set out to make the violets and lilies turned out to be crazy.  I had already made the royal icing, now I just needed to color it and pipe the flowers.  Except, I could not find my violet food coloring gel anywhere.  I looked in every possible location before remembering that I had thrown it away.  When food gets into the food coloring, it goes bad.

At this point, I should have just decided to mix different colors to make purple.  But I thought that would take too much time and be too difficult to get the color right.  So, I thought I'd just pop over to Walmart and get some violet food coloring.  I hopped into the car and off I went.

It took me awhile to find the cake aisle at Walmart.  That place is HUGE.  I found it, located the coloring gel and then the section with violet and, wait what?????  The only color they are out of is VIOLET?  Are you kidding me?  Is this some kind of cosmic joke?  I kid you not, the only color they did not have was violet.

Okay, I can still do this, I thought.  I'll head over to the Target across the street.  Surely they will have some.

And . . . . .  that would be a no.  I actually bought some food coloring there, but I opened the package and it was the wrong kind (you do not want to add liquid food coloring to royal icing!), so I promptly returned it and rushed out to my car.  I didn't want to trek all the way to JoAnn's - so where else could I get this stupid gel?  AHA!  Hobby Lobby!  Perfect, should have that of that in the first place since it was on my way to Walmart.

Unfortunately, by the time I got to Hobby Lobby, it was closed.  This was turning into a ridiculous waste of time.  But by now, I had to get the color because I didn't have time to make my own.  And so off to JoAnn's I went.  I burst through the door, ran to the cake aisle and my heart stopped.  Could it be they are also out of violet?  What, is everyone making purple colored cakes or something?

I got the very, very last bottle of violet coloring gel.  Whew.  Crisis averted.  So far.

I finally got back home and colored the icing orange and purple.  I started with the lilies.  Now I have always liked making royal frosting lilies because they are so easy.  Famous last words.  I think that some grease may have gotten into my icing because these lilies refused to dry.  You pipe them on aluminum foil in a lily nail and then set them to the side to dry.  Later you remove the foil.  But for some reason, it did not work.

They look deceptively nice sitting on their foil squares.
So I began to freak out that I wouldn't have any flowers on this cake!  I started piping the violets and they looked horrible.  It just looked like lumps of purple icing.  I was really starting to panic now.  But I adjusted the way I was holding the piping bag and it started to work a little better.


I decided that I needed to make another "big" flower, just in case I couldn't use the lilies.  So I made some purple primroses as well.  I'm so glad that I did.


I also made some royal icing leaves and left them to dry.

Compared to the flowers, the cake part went pretty well.  The fondant went on the bottom tier nicely.


The ribbon I was a little nervous about.  It's a common thing to see on fancy cakes (I guess non-edible ribbon just doesn't count??) but I had never done it before.  I used this tutorial and it turned out to be fairly simple.  I just got the ribbon wet, squeezed out the excess and then stuck it to the fondant.  No pins or gum glue required.


Next I added the pearls.  I just sort of eyeballed them.  I did use my small spatula to make sure they were at least somewhat similarly spaced.  Then I just piped on two dots of clear piping gel and added the pearls.  I love this look.  Pearls are my new favorite thing!


I frosted the top tier and got everything ready for the next day.  The plan was to put the whole thing together at a church near the outdoor wedding and let it stay out of the sun until the reception.

The danger started early.  I had packed up my car and was heading out of my driveway, very slowly.  As I came up to the road, preparing to turn right, this car came out of nowhere, zooming down the street right in front of me.  I had to slam on my brakes.  Although I wasn't going very fast, the sudden stop caused the top tier, which was sitting in a box lid on my front seat, to fly forward.  I swear my life flashed before my eyes.  Everything went in slow motion.

And I caught the cake.  Well, technically I caught the box with the cake in it, but regardless, the top tier was saved.  Which was good, because I had no time to make another one.  I was pretty shook up after that, but I managed to make it to the church in one piece.

Of course once I arrived, I discovered that the building I was supposed to be in was locked.  I tried every single door.  I knew that the girls would be there at some point to change, but I needed to get in now so I could finish the cake.

I made some calls and discovered that the bride's sister had the key to the church.  But of course she was at the park where the wedding was going to be, helping to set up.  I jumped in the car, drove over carefully, and then sprinted across the park to get the key and back to the car.  Then back to the church where I finally was able to put the cake together.

I finished the basketweave and started to add the flowers.  


But as I feared, the lilies would not come off of the foil.  I tried several of them, but this is what happened:


So I grabbed my scissors and tried to cut as much of the foil off as I could without breaking the lilies.
I was really disappointed that they didn't work correctly.  I did not like how it looked with the foil.  But everyone else seemed okay with it.


Finally, I piped on their initials.


Not bad for freehanding it.  Here are some close ups of the flowers:


After the ceremony, my dad and I went back to the church to get the cake.  We drove very slowly but there were no more close calls.  Here is the cake on the dessert table (other desserts were added so it didn't look so tiny on this huge table).


Congratulations Tehillah and Nathan!

Two weeks down, one to go.  Will I survive?

Wednesday, April 9, 2014

I'm Gettin' Married In the Morning!

I met Leslie and Darren at my church.  Leslie saw the Whimsical Panda cake and thought it looked like it could have been a wedding cake.  She and Darren had been cake tasting, but they hadn't found a place that made cake they liked.  And it was very important that it taste good.

So they came to me.  Ooooh, I'm famous!

I had a meeting with the two of them a few months before their February wedding to talk about what they wanted.  Leslie showed me some pictures and we talked about the elements that they liked.  We ended up deciding to do a three tiered cake, with quilting on the top and bottom tiers and their initials on the middle tier.  The topper would be red roses and each tier would also have some roses.  Then I would also make an extra sheet cake to ensure we had enough to feed all the guests.

As we talked, I mentioned a groom's cake that I had done.  Darren had never heard of a groom's cake, so I explained the concept.  Be careful what you tell prospective clients!!!!!!  He thought it would be great to have a groom's cake.  Darren is British, so his idea was to have half the cake be the British flag and half the American flag.  Alright, so flags are pretty much lines and shapes, that shouldn't be too hard.

I was nervous about the red roses.  Red is such a hard color to get right.  And I did not want it to look pink.  But, I remembered that I had used Wilton Spray on my red dance shoes and I thought that might work for the roses as well.

I knew I wanted to make at least 40 roses to make sure that I had enough.  I'd be assembling the cake the morning of the wedding, and it was my worst nightmare that I would run out.  I literally had dreams that I was putting the cake together and didn't have enough.

So a few weeks before the wedding, I started making roses in every spare moment I had.  Fortunately, I learned how to do this in one of my cake classes.

You start by making rose bases.  You have to make these first, on spaghetti (or wire if you are using wire instead) and then let them dry before you start putting the petals on.

Petals
You roll the fondant very thin and then cut out a bunch of pieces using the large rose cutter.  While keeping the rest covered, one by one you add the petals to the base (the process is slightly more complicated, but we won't go into boring details).  I made 4 different sizes, rosebud, 3-petal rose, 5-petal rose and 7-petal rose.

Rosebuds.
7 petal and 5 petal rose.
After the roses dried, I sprayed them with the red Wilton spray.


Here you can see the difference in color.  The one on the left is made with red fondant but not sprayed.


I think the final count of roses was 46.  That's a lot of work.  I went through a lot of episodes of Alias and Eureka while making these.


I baked the cakes on the Thursday before the wedding.  One six inch, one 8 inch and one 10 inch round, plus the 9x13 grooms cake.

I'm still pretty nervous about fondant ever since the Monster's Inc. cake.  And although Chicago was in the middle of negative-this-is-crazy-14 weather, my apartment was a balmy 85 degrees.  I was the only one in Illinois with my windows open!!!

I don't control the temperature in my apartment, my downstairs neighbor does.  And heat rises . . . . . I knew there was no way the fondant was going to work in that heat.  I actually had to ask my neighbor to turn the heat down so that I could make the cake.  Which she very graciously did (she didn't know it was so hot in my apartment).

So with a breezy 75 degree apartment, the fondant went on smoothly and I got the three cakes filled and covered.  Then I had to do the quilting on the top and bottom tiers.

There are several different ways to get the quilted look.  I chose to use a diamond cutter.


You line it up and press it in the fondant around the sides of the cake.  The hardest part is learning how hard you need to press.  Too soft and the lines aren't visible, but too hard and the frosting underneath starts to show.  You also have to do it quickly because the fondant starts to dry and crack.  I did have some cracks and I wasn't really happy with how it looked.  I had to remind myself that no one would be standing one inch from the cake, examining the smoothness of the fondant.  And later when I added the pearls, it looked much better.


For the groom's cake, I had my brother (futurewolf) create the custom design for me, which turned out great.  But then I had to print it out as a 9x13.  My printer can't handle such a task.  So I took it to Kinkos.  On the phone, they told me that it was going to cost around 5 dollars to print.  WHAT?  Five dollars is ridiculous!  But what else could I do?  The wedding was the next day.  So I had them print it.  Of course when I got there, the picture was facing the wrong direction and it was in color.  Way to follow instructions Kinkos!  They did fix it fairly quickly.  I almost fell over when they told me the cost was $0.25.  That was more like it!

I taped down the image on the table and taped parchment paper over it.  The tape is very important so that your image doesn't move.


Then I piped clear piping gel on all the lines of the image.


After letting it sit, I flipped the parchment paper over onto the cake and rubbed the piping gel onto the frosting.

Then I started filling it in.

White:

Blue:


And red:


To achieve the smooth look, you pipe the frosting in.  Then dip your finger (clean finger, of course) in cornstarch and spread it around evenly.  The cornstarch keeps the frosting from sticking to you.

For the stars, I used little star sprinkles.  They were perfect!

American flag on the top left and bottom right;
British flag on the top right and bottom left.
I used the same technique to put the initials on the middle cake.  It didn't work quite as well so I had to kind of freehand the letters.  But it turned out nice.


DAY OF THE WEDDING:

Another snow storm.  We have had our share of snow this winter!!  So the snow was thick on the ground and more was falling.  I loaded up my car and my sister, Amy, arrived to be my assistant.  The roads were really slick, so I had to drive very carefully, but we made it in one piece, albeit a little later than I had planned.

My sister helped me put the tiers together.  As she put it - she doesn't really like seeing the behind the scenes work that goes into making the cake, she'd rather just see the final product.  Apparently it ruins the magic.  But I could not have gotten this done without her.

I added the border on the tiers while she put the pearls on the quilted pattern.  I thought the quilting looked pretty good, but when you add the pearls, it really makes it pop.

My beautiful sister adding pearls to the cake.


To get the pearls to stay, you just put a dollop of clear piping gel on each "X" and the place the edible pearl on top of it.  The piping gel holds it in place.


And then the big moment arrived.  I put a mound of frosting on the top tier and prepared to place the first rose.  My trusty assistant was very nervous that I was going to mess it up.  Thanks for the encouragement sis!


The first flower went on and everything was still fine.  So I just kept adding flowers.


Once the top was finished, I moved on to each tier.  I think I would do the top a little differently in the future, but it turned out okay.


I'm not sure how long this took, but finally all the roses were in place.


With a sigh of relief, I began to add my favorite part, the leaves.


The leaves just add that extra dimension, don't they?


I'm really proud of these roses.  Everyone said they looked like real flowers.  They represent a lot of hard work.  So here's some close up shots:


Seriously, this picture looks like it could be from a magazine.


Funny story - Leslie's daughter, Georgia, came in the room as we were working on the cake.  She was all dressed up in her white flower girl dress and had her hair done.  (Can you tell where this is going?)  She asked if she could have a flower.  So I said sure, as long as I had extra.

She came back later to collect her rose.  My sister handed her one.  Both of us thought she was going to keep it and take it home with her.  But no, she just took a huge bite right out of the flower!  I think Amy and I were a little shocked.  I mean, they are edible, but we just weren't expecting her to gobble it down.  Right then.  Shortly before the wedding!


And of course the color from the flower rubbed off on her hands, her mouth, and even got on her neck!  Oh boy, we narrowly averted getting into some major trouble.  None of it got on her dress, thank goodness.  We sent her off to the bathroom to clean herself up and told her NOT TO TOUCH ANYTHING.  Hah, sorry about that Leslie.


The last step was to add the border to the groom's cake.  (I almost ran out of frosting, but I had just enough)


And finally I was finished.


The cake was so heavy and the base was not really sturdy enough (I was trying something new, but I won't use this kind of base again).  So I was really, really worried that when the caterers moved it from the cart to the cake table it would collapse in on itself.  I had visions of cake everywhere and my lovely creation destroyed.  I didn't see them move it, but apparently all went well because the cake was in one piece.


Displayed at the reception


I love that the color of the roses matches so well!


Thank you Leslie and Darren for trusting me enough to make your wedding cake.  Congratulations and I hope you have many happy years together!