Thursday, October 23, 2014

"It'sa me, Mario!"

The challenge: Three cakes in three weeks.

I went for months without making a single cake.  Then suddenly, I realized that I had committed to three cakes in three weeks.  I would need to be Super Mario himself in order to pull this one off.  Would I rescue the princess?  Or would I succumb to the mushrooms, flying ducks, spitting fireballs or worse?

Only time would tell.

Week One: Mario

My nephew, like many young boys his age, is obsessed with video games.  He LOVES Super Mario.  And he is very good at it.  He was quite shocked to discover that I hadn't passed the first world yet (he's beaten the game and is now trying to go back and collect all of the star coins).  I have since made it to World 2.  Where I am stuck on level 5.

So we decided to make a Mario cake for his birthday.  Now, I may not be the best at playing Mario, but I was determined to be the best at caking Mario.  You know what that means.

A Super Mario fondant figure.

I've been getting better at my people/figures/fondant sculptures, so I wanted to try this out.  The idea was to make a sort of simple cake, just one tier, with a lot of the Mario elements.  Then on top, I'd put a pipe and Mario going into the pipe.  Piece of cake.

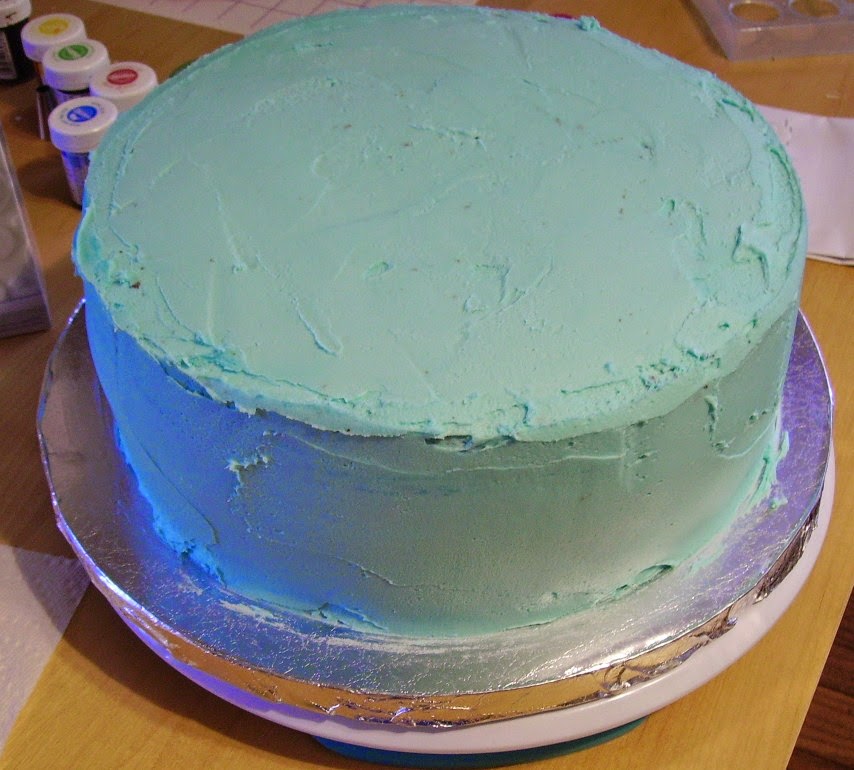
The cake itself wasn't too bad.  I made a chocolate cake with chocolate fudge filling, as requested, and covered it with light blue fondant.  I freehanded some green fondant to look like trees and hills.

That's what it looks like right?  Trees and hills?

Then I did some clouds.  I looked everywhere for a cloud cookie cutter, but I couldn't find one, so they are free-handed too.  Who knew making clouds would be so difficult?


I made some yellow fondant and cut out a bunch of stars, squares and circles to use as elements on the cake.  I also cut out red circles and ivory circles to make little mushrooms.

They are all covered so they don't dry out before I need them.
Then I started adding elements.  I decided which section I wanted to be the front and added the brown door.  I also added some piranha plants in pipes.


Awww, it looks so cute and innocent right now.
Then I began adding stars, coins, mushrooms, and question blocks.


Then one of my favorite elements - the vine.


Then I did some piping to finish off the elements.


Then I started to work on Mario.  I used two tutorials that I found on Pinterest.  Mainly this one from  by Cesare Corsini on Cake Decor but also this one which I have no idea where it came from.  I started with the body.  Cesare's tutorial is for a Mario that is standing, but I wanted it to look like mine was going into the pipe.  So I omitted the legs, but I put two little stumps there so it would like he had legs that were in the pipe and also to help balance the body.  Sometimes I think we make the mistake of trying to make the body and then add the clothes.  You have to think of it a little differently so it is easier to make.  So here we see the blue pants and the red shirt.


I add the arms in red (all of this is using gum glue to stick it on tight) and then the suspender straps.


For the head, I made a ball out of ivory fondant and made eye impressions with one of the green fondant tools.  I tried to follow the tutorial as best I could.


He used paint for the eyes, I went with mostly fondant, except for the pupils.


It took forever for me to figure out if Mario had brown or black hair.  In some pictures, he had brown hair but a black mustache!  I just decided to go all brown because it was easier and I didn't want to buy a whole thing of black fondant.  This was white fondant that I colored brown.


I made the back of his head kind of flat because I knew I would be adding the hair.  I'm still not very good at the whole weight balancing thing.  This little guy got real heavy, really fast.  I did have to adjust the head later on.  Another problem was that I had already painted the pupils onto Mario's eyes using black food coloring.  Then when I was squeezing the hair on, I realized my fingers were touching his eyes!  So it got a little bit smeared.  Probably should have painted the eyes on last.


The hands were pretty fun to make.  I just used a knife to cut the fingers and then shaped them a little and folded them over into fists.  They look pretty good!

If I ever do this cake again, I will not make the pipe the same way.  I thought that I had this brilliant idea - I would use the cake that I cut off the round cakes to make them flat.  Then I would mix them with frosting, like a cake pop, cover that with fondant, and have a great pipe!

The first problem was that I used my new baking strips.  My old ones were kind of dying so I replaced them with these purple cloth ones.  The thing I love most about these is that they have built in straps to hold them in place against the cake pan.  No more pinning the baking strips!!!! Yay!

You can get a six piece set at JoAnn's for $25 and if you use a 40 or 50% off coupon,
that's pretty close to what Wilton charges for 2 pieces.

However, they worked so great, that at first I thought I wasn't going to level them at all.  And then there would be no cake to make the pipe.

However, I did end up leveling them and using that to make a pipe shape.  I tried to freeze it after I mixed it with the frosting, but it did not stay firm.  (I know now that I used waaaaay too much frosting).

So it took awhile, but I finally got some fondant over it and it sort of looked like a pipe.  Sort of.


I brought Mario separately to my parents house, planning to put him on the cake after arriving.  Unfortunately, since he was so heavy, the foot stubs I had on the bottom had flattened in front, causing him to lean forward.  So I just added a little more blue fondant on the bottom to balance him out.

Here is the finished product, right before we cut it:


It kind of looks like he is standing on top of the pipe with really, really short legs, but oh well.

I tried to get a picture from all angles, so you can see all of the details.


You can see here how Mario's eyes got a little messed up.


And here is the birthday boy with his cake!


Happy birthday Peter!  


One down, two to go.

Friday, June 27, 2014

Let it Go!

Unless you have been living under a rock, you have heard of the movie Frozen.  I think every kid that I know has seen it at least once and has the soundtrack memorized.  My niece turned five in April and she chose to have a Frozen party.

Now I have not seen the movie.  Which of course shocked all of my niece's little friends.  I've promised to have my niece and nephew to my house for a sleepover when we will (FINALLY) watch the movie together.  My niece brings this up every time she sees me now.  "I'm still planning our sleepover, Aunt Joy," she said to me the other day.

I've read a lot about the movie so I kind of know the basic plot and who the main characters are.  Plus the movie is called Frozen, so ice is going to be a given.  And there is no shortage of Frozen cake pictures on the internet.  It's a crazy fad (but a good one).

I planned to do a fairly simple cake, but I still wanted it to look cool.  I decided to do a 10-inch round cake in light blue frosting.


The top would be covered with white fondant, like this:

This was the goal.
Maybe I shouldn't show this picture . . . .

You might think this would be easier than covering an entire cake with fondant.


But you would be wrong.  


If I did it again, I think I would do it very differently.  It's hard to make it smooth and nice with nice curvy edges.  It did not look that pretty, but I figured I could cover it up with snowflakes and make it look better.


Any Frozen cake worth it's salt needs to have snowflakes right?  I scoured the internet looking for a snowflake mold.  I finally found one that I really liked, but I didn't really want to spend over thirty dollars for a mold.

So instead I got this one.


I was a little apprehensive because many of the reviews on Amazon complained that the mold was way too shallow and therefore unusable.  But you don't want to have super thick snowflakes!!!  They are supposed to be delicate.  Anyways, it was pretty shallow, but it worked fine to pipe in the melted chocolate.  I made white and blue snowflakes.  (These turned out to be extremely popular with the kids.)

Now I needed a topper.  My plan was to buy Elsa and Anna figurines to just put on the top of the cake.  But you cannot find these figures anywhere for under ten dollars.  Seriously, it's impossible.  I knew I didn't have time to try and make them out of fondant.  Plus people are really hard to make.  So I asked Elisa which of the characters was her favorite.  "Elsa and Anna," she said.

I know you like both but which one is your favorite?

"Both," she said.  "And Olaf too!"

Aha!  Olaf is a snowman.  I don't really know how he fits in the story, but a snowman is made of round shapes.  I could make an Olaf!

I found this picture tutorial on Pinterest.  It is a little blurry, but it was clear enough to follow the directions.  I made Olaf the night before due to illness preventing me from working on it earlier in the week.  If I could do it again, I would make him more in advance.


I put him on a lollipop stick instead of a dowel.  First I made the three balls so I could tell if they were about the correct size.  I put two balls on the stick and added the feet.


Then I made the head.  I thought this would be the hardest part.  I only had the picture instructions, so I was just kind of making it up as I went along.


At first it looked super creepy.  Here I've added the eyes and the background for the mouth.


Now the eyebrows and the buttons.


Next the little hairs on his head.


The arms were actually the hardest part.  I wrapped fondant around toothpicks, but it did not want to stick!  Eventually I got it to work.


Add the tooth and the nose - and there's Olaf!  I could only hope that he wasn't too heavy to stand up.

I also wanted to make a candy "5" for the top of the cake, but I wasn't sure if it would hold up either, once the candy hardened.  I piped the candy onto some parchment paper and stuck the lollipop stick into it.  I piped the blue candy over the white and stuck it in the fridge to harden.


On the day of  the party, I added the snowflakes to the cake and piped on Elisa's name.  Then I added blue raspberry rock candy crystals all along the border.  I was a little disappointed with this purchase.  They had absolutely no flavor whatsoever and only succeeded in turning my hands completely blue.  I would not buy them again.  But it did look cool - so I guess it was worth it.


I brought the cake to my sister's house without the toppers on.  I wasn't sure if the lollipop sticks would hold, so I didn't want to stick them in until I got there.  The five went in fine, although the stick was a little too long for the cake.  Should have made it slightly shorter.

Olaf went in fine too, but he was a bit heavier than I realized.  I knew that he was going to sink into the cake.  I wished I had a longer stick for him.  But we got some good pictures taken right away.  Olaf managed to stay up through lunch and through ice skating, which was several hours.  He did sink a little bit, but it wasn't too bad.


Everyone wanted Olaf, but of course he belonged to Elisa.  Unlike her brother, who chose to save his fondant angry birds, she decided to eat the poor snowman.


All in all, a very successful cake.  Happy birthday to my beautiful niece Elisa!


*If you are interested in ordering an Olaf topper without a cake, send me an email and I'll see what we can do.

Thursday, June 5, 2014

Under the Sea

If you ever need an event planner, look no farther.  No, not me.  My friend Hillary is amazing at this stuff.  She was in charge of this shower for my sister-in-law and it was probably the best decorated shower I have ever attended!  Seriously, she has a gift.

So Hillary asked me to make some cupcakes for the shower.  The theme was Under the Sea - a Shellabration.  She found these super cute turtle cupcakes on Pinterest.

But I didn't really want to make 48 turtle cupcake toppers.  So I decided to do some starfish and shell cupcakes as well.

The shells were easy.  I used the Wilton shell candy mold and made sets of light blue, dark blue, green, and "sand" (aka peanut butter flavor) candy shells.  They turned out great!


The starfish were also really easy.  I used a star cutter and cut out thick orange fondant stars.  I used the wrong end of a piping tip to make the smiles.  I let the stars dry on the flower drying rack so that they would be slightly curved.  For the eyes, I dipped a toothpick into black food coloring and the stuck it into the star.


The turtles were slightly more complicated, but they were very cute.

I used the circle cutters for most of the turtle.  The small one made the feet.  I just had to cut off one side and reshape them.


I used the large cutter for the blue background and the medium cutter for the head and body.  I just made the head smaller.


I used the wrong end of a piping tip to make the smiles.  I used gum glue to attach the turtle to the blue background.


Then I added the legs.


I used piping tip 3 and cut the circles in half to make the little spots to go on the turtles back.


I also used a toothpick dipped in black food coloring for the turtles' eyes.


They dried overnight and then I just had to add them to the cupcakes.


I got a new cupcake stand that holds more than my old one and is a platform.  So we put brown sugar on it to look like sand and added a few candy shells.


We also placed some cupcakes on the tables as part of the centerpieces.


The cupcakes fit in great with the decor!