Tuesday, January 31, 2012

Lesson 8: The Perfect Final Cake and the Basketweave

I am the first to admit that everytime I make a cake, something goes wrong.  It isn't always a major catastrophe, but there is always at least one frustrating thing that happens.  But for some reason, when I made my final cake for this class


nothing bad happened.


Just wanted you to take that in for a moment.  Everything went smoothly!  Unheard of!

I made the flowers a few days before I made the cake.  My niece, Elisa, picked out the cake she wanted me to make - the button flower cake.  So I rolled out four different colors of fondant and used my button flower press and homemade gum glue to put them together.


By the time I was done, Elisa and Peter (my nephew) had arrived for dinner.  Of course they wanted to help Aunt Joy make the cake!  So they helped me to cut out the leaves.

This was a apparently a very exciting prospect.
The flowers and leaves went into a box to dry for the next couple of days.

Tuesday morning, I made a two layer 8inch double fudge chocolate cake.  Each half came out practically perfect.  The baking strips worked wonderfully and I barely had to cut any cake off the top.  I filled the cake with my infamous chocolate fudge with chocolate chips.  Nothing leaked out of the middle.  I frosted the cake in a beautiful yellow frosting - and seriously it was my best job frosting a cake ever.

Look at how smooth this is!!!!!


So it was too bad that I was covering the entire cake with the basketweave.  Hence the many pics of the undecorated cake - I had to have proof that the frosting job was really good.

The Basketweave

The basketweave is a beautiful style using buttercream (yay you can eat it!) that I have always loved.  It is also really good for covering a bad icing job.
How the basketweave is supposed to look
(with a shell border)
 I tried to do it once on a two tier cake.  It was a little unusual because the basket weave I tried was two-toned.  Usually I think it is best to do it all one color.

I got the idea for this cake from one of my cake books.

The chocolate leaves on the top are really cool though!
Let me tell you, learning this technique just by reading the directions is really complicated.  My first effort wasn't too bad - and it doesn't help that my cakes were lopsided and different sizes.  Makes it hard to look uniform.


Basketweave is SO much easier when you actually see someone do it first.  But it takes a long time and a lot of patience.  It's also a good idea to practice before actually putting it on the cake.

You have to make sure you have the right consistency of icing.  Two of the women in my class made their buttercream frosting without trans fat - for various reasons.  Unfortunately, without the fat, the frosting just doesn't work correctly.  Their basketweave literally fell off the side of their cakes.  There is nothing more depressing than finishing 1/4 of your basketweave only to see it tumble like the walls of Jericho.  Very discouraging.

But when the icing sticks, it looks very nice.  Here's how mine turned out:

Basketweave

It looks different than the example above because I used a different tip.
Either one works.

I thought about doing the shell border, but I decided against it.

Next I had to add the fondant flowers and leaves.  I wasn't sure how good it was going to look - I confess I had my doubts.  But I think it came out really well.


I took the cake to my good friends the Petrys. The kids were very excited. 
Ready to eat the cake!
Their mother took a bazillion pictures and was texting them to all of her family members to give them dessert envy.  She put it on a nice elevated cake plate (I may need to invest in one of those) and it looked very professional. 


So, according to the Petrys - the cake tasted great!  The kids each ate a fondant flower - I'm not a fan but they think it tastes good.


Stephen wanted the pink flower.
This is the first cake that I've made that I really feel looks like it could have been made in a bakery.  I'm very proud of this one.  I have learned a good many things from these classes.  Now I just need a reason to make some classy cakes!


And that's the end of my cake classes . . . . . for now.  

Saturday, January 28, 2012

Lesson 7: Irises and Daffodils and Lillies, Oh My!

Round #2 with the Royal Icing.

Okay, so something clicked with me and the Icing Royale this time around.  I made a double batch because I didn't want to go to Jewel to buy the 1lb box of powdered sugar, and all I had was a 2lb. bag.  Plus we needed two recipes for class (supposedly, but in actuality - no).  Anyhoo, the frosting turned out much better this time.  More like a thick toothpaste.  So much easier to squeeze out of the piping bag.  Hallelujah.

But I wasn't the only one dealing with hand cramps.  One of the ladies in class had cramps so bad that she could hardly finish the lesson.

For this lesson we were learning irises, daffodils, rosebuds and lillies.

The rosebud was totally confusing and took a long time to figure out.

Practice board

This is way harder to do than it looks.
Next we moved on to the iris.  It's another really little flower similar to the apple blossom, but this one only has five petals.  Pretty simple, but cute.  This was one of my favorites.


Then came the daffodils.  These are a really nice flower, but they take a lot of work.  First you pipe the petals on the flower nail.  Then you wet your fingers and make the petals pointy.  Last, you pipe the round middle of the flower.  I really like how they look, but man, is it tedious.


And then finally the lillies.  I have wanted to learn how to make lillies for a looooong time.  Of course there is a special lily nail.  You put foil into the bottom half of the nail (and of course they sell packages of special lily nail foil - because getting Reynolds wrap is just way too hard).  Then you push the foil down using the top part of the lily nail.  This is the only purpose for the top part of the lily nail.  Seriously.  Next you pipe the petals of the lily.  Using a dot of green icing, some water and a paintbrush, you bring the green color up onto the petals.  Insert the stamens (which are not edible) and you are done.  I guess stamens are just too hard to make edible so we give up on the whole "it's completely edible" thing.  Not that you would want to eat these lillies anyway.  You might break a tooth.

Finally - a lily that I'm not allergic to!!!
The lily removed from the nail and foil.

 Next lesson is my final cake for class two!!!!!!!!!!!!

Saturday, January 21, 2012

Lesson 6:The Pain in the Primroses

OOOOOwwwwwwww.

That's how my hand felt after the last lesson. It hurt to squeeze anything, pick up anything, type, or basically move my hand at all.

Royal icing is a royal pain.  Perhaps that's how it got the name Royal icing.

Cake decorating is no stranger to pain. The constant squeezing of those piping bags can cause your hand to cramp up. Badly.  For example, when I made this behemoth, my hand hurt so badly from piping on the windows that I had to run it under cold water a couple of times before finishing.

There are 6 cakes in that school building.  Six.  With 40 windows and 1 door.
As an added bonus - in the amount of time it takes for you to get up and put your hand on ice, your royal icing can harden right up.  Many times I have declared - never again! (Including the time I made this cake).  But somehow that never seems to be the case.

Royal icing is fairly easy to make and much easier to clean up than buttercream.  It consists of powdered sugar, meringue powder and water.  It dries rock hard and tastes horrible (unless you like the taste of meringue powder).  So although technically it's edible, you probably wouldn't want to eat it.

So why do we go to all the trouble of making the cake edible when it isn't really edible?  
Search me.  
I guess we just want to be cool and say - yeah, I made that out of frosting.

For our lesson with Royal Icing, we made primroses, apple blossoms and the Wilton Rose.

I was not happy with how my teacher taught us the Wilton Rose.  She taught it exactly like the ribbon rose, but with royal icing.  And then she kept telling me I was doing mine too much like the ribbon rose. (Well, yeah, since you taught both the exact same way!!!)
The Wilton Rose
My Roses
(If you squint, they kind of look like the 7 tiers of Minas Tirith,
the White City of Gondor.  Now that would be an awesome cake.)
See?
 Finally I just did one the way the book said to, instead of the weird pseudo ribbon rose thing she taught us.  But it was really disappointing because I had so wanted to learn how to make nice roses!  I guess I'll just have to practice at home.
My attempt at making a real rose.
Speaking of practicing . . . . My teacher was telling everyone the importance of practicing at home in between classes. She said - now I know that Amanda (culinary arts student) and Joy have been practicing at home.  Riiiiiiiight.   I felt like I was in piano lessons again when my teacher would tell me how she could tell I had been practicing at home that week or she could tell I was counting when I played.  (I didn't.  Well I didn't count.  I practiced sometimes).   
   
Next we moved on to apple blossoms and Awkward Moment #2.   Apple blossoms are a tiny little flower.   You turn the flower nail and move your hand up and down as it turns to make each little petal.   I caught on to this fairly quickly.   So my teacher made everyone stop and watch as I piped one.   Talk about pressure!   I'm sure my face turned completely red and I suddenly was extremely nervous.   Fortunately I didn't screw it up.   
Apple Blossoms
Wilton Apple Blossom
My Apple Blossoms
Once you pipe the flower on the nail, you remove it and put it in the flower former.   Now I don't know yet how valuable a flower former is or if it is just another way for Wilton to get you to spend money.   But it does keep your flowers from drying completely flat.

Then you add the little dots of color using tip 1.   Which is hard to use even with butter cream, let alone my crazy stiff Royal Icing.   Eventually I ended up using tip 3 because it just wasn't working.

Apple blossoms drying in the flower former.
And finally we finished up with the primrose.   You use a very similar motion to make the primrose, except it's bigger and you make a sort of heart shape with the petals.   
Primrose
Wilton Primrose
This one was in the flower former,
so it is not as flat as the picture above.
Then you add a little star in the middle and a little dot on top of the star.   Remove from nail, place in flower former.

Drying primroses.
Once the flowers are dry enough, you put in them in a box and keep them until you use them.   And then go get some ice for that hand.

Wednesday, January 11, 2012

New Look

So I'm trying out this new template!  I thought it was kind of cute.  What do you guys think of the new look?  Should I keep it?  Or switch back to the old one?  Leave your comments!

Sunday, January 8, 2012

Dinosaurs and Dragons

I have known my friend Hillary since the fifth grade.  She has been best friends with my older sister for about the same amount of time.  Her son Noah turned three in December and she asked me to make the cake for his party.  (I mentioned him in my New Year's post - he's a big fan of cake.)  Noah loves dinosaurs.  In fact, I have never seen so many dinosaurs in one place than at his birthday party.  And Noah wanted a dinosaur cake.

I got the idea from Sweet Dreams by Tracy, found on Pinterest - a website that is becoming extremely popular and thoroughly confuses me.  I thought the design looked a tad more like a dragon than a dinosaur.  But then I was informed by my siblings that dragons and dinosaurs are the same thing.  So as long as the cake looks cool . . . . .

(Author's Note - a reader pointed out that Sweet Dreams is no longer in existence, so here are a few links to other tutorials if you aren't happy with mine.  3d Dino Cake3d Dino Cake Video)

I started with some butter fudge Duncan Hines cake mix.  I'm not a huge fan of the butter mixes.  They just end up being a huge pain.  For example, they get all big and puffy, overflow the pan and then when they cool, they sink back down again.  Just a tad bit frustrating.  But it worked.

I used one six-inch, one eight-inch and one 9-inch round pan to make the body of the cake. (Yay Christmas presents for making this cake possible!)

I torted the 9-inch and filled it with one of my most popular fillings - hot fudge topping with chocolate chips.

Yummy filling.  You always want your dam to be the
same color icing as you are going to put on the outside of the cake.
(A little shout out to Pastor Dave who happened to be around and
opened the fudge topping jar for me.  Greasy hands you see . . .)
Then I cut the 9-inch and the 6-inch in half.  I added filling on the 6-inch halves and stuck them onto the sides of the 9-inch halves (also stuck together with filling).

Building the body
Then I cut the rest of the pieces from the 8-inch cake, adding a tail, neck and head.  I stuck the pieces on with icing.  My cake board was a little too small, but I managed to squeeze it all in.

Ready to be iced.
Dino head.
The neck and body.


Building a cake like this is really hard.  You get a lot of crumbs - which makes it hard to ice.  Plus you have to be sort of a sculptor - carving pieces so they will fit together and look they way you want it to.  But it can look great.

The tail

I was a little nervous that the cake halves
would not stay balanced on their side - but they did.
Next I frosted the entire cake with green frosting.  I believe I made 2 1/2 batches of frosting for this bad boy.  That's a looooooot of powdered sugar.


This was a little frustrating as well.  The crumbs kept mixing with the frosting and there were some very hard places to reach because of the way I built the cake.  In the end, I just decided that he would be a dirty dino. More realistic that way.


Once that was done, the real fun began.  I started adding the embellishments.  First came the eyes and nostrils.

I used tip 12 to create the nostrils and the green part around the eyes.  Then I used white frosting with tip 12 to make those lovely white eyeballs.  Add a dollop of black color to the eyeballs and there you have it.

Next came the legs.  Again using tip 12, I made front and back legs, along with some little green "fingers" with tip 3.  I finished the look with tip 3 yellow nails.


I also added some tip 3 teeth and little yellow spikes behind the eyes and at the end of the tail.

It kind of looks like he's grinning - totally unintentional, but I like it.

Back to tip 12 - I added some green spikes down the dino's neck, back and tail.

He's starting to look pretty awesome!
The last part was to add the red spikes.  I made these earlier in the day while the cakes were baking.  I melted some red Wilton candy melts in the microwave.  Then I put the resulting mess into a plastic sandwich bag and cut off the corner.  Next I outlined some triangles on parchment paper and filled them in with the candy.  I made 4 different sizes.  Finally I let them dry for the rest of the day before putting them on the cake.  (Sometimes when I use this method, I'll stick the candy in the freezer to harden.  The only problem with that is that it tends to start to melt when you take it out.  But if you need it to harden quickly, the freezer it is.)

You might notice that the cake is sitting on my ever faithful turntable.  I love that thing.
I thought the red spikes really made the cake.


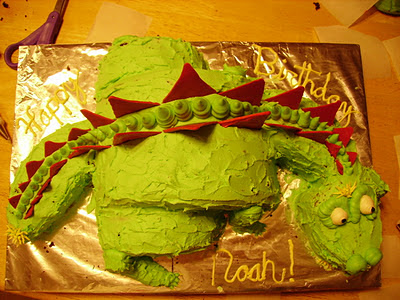
Finally I piped the words on the cake board with tip 3.  And the cake was all ready to go!


Happy birthday Noah! - love, the Smiling Dino.